
Buttermilk Biscuit Recipe Light and Buttery
(Originally published July 1, 2008) I told my mother I was going to do a web tutorial about my buttermilk biscuit recipe, a staple in the south. She said “Oh, you HAVE to do that new recipe!”. Now, admittedly, these are awfully good. So good, the fact, that my mother has abandoned the long taught family method in lieu of this one shows just how good this recipe is.
Light and Tender Buttermilk Biscuits
The finished product is lighter and more tender than our usual biscuit and it is worth the effort. If you have had problems in the past with your biscuits turning out to be more like hockey pucks than our beloved southern staple, this recipe is the one for you.

The ingredients needed for this Buttermilk Biscuit recipe are:
- Milk
- Butter
- Lemon juice added (because I rarely have buttermilk in the house so this is a homemade concoction)
- Self rising flour
That’s it! (The actual recipe is at the bottom of this page)
For those of you who have no idea what self rising flour is this is how you make it:
*To make your own self rising flour, simply add 1 1/2 tsp baking powder and 1/2 tsp salt for EACH cup of all purpose flour.
Sift ingredients well to make sure it is uniform.
How to Make The Best Buttermilk Biscuits Step By Step
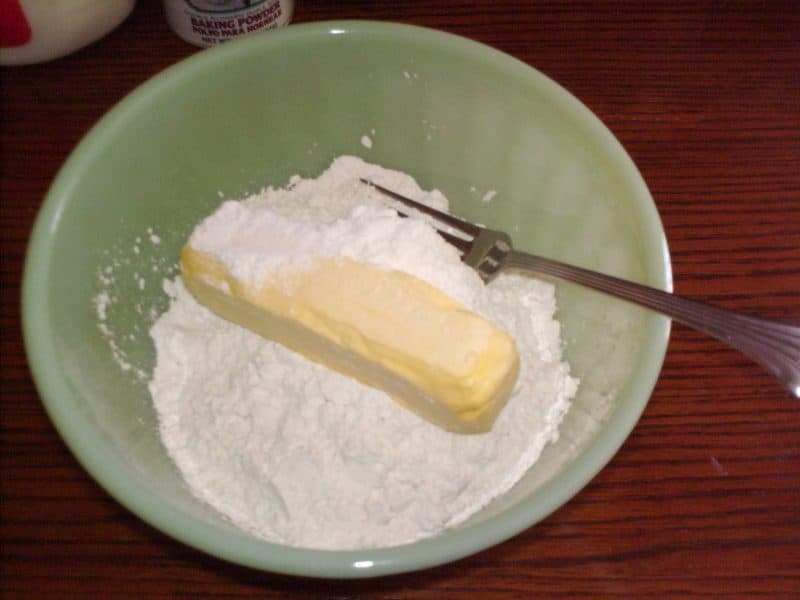
Put your flour in a bowl (With the salt and baking powder stirred into it if you don’t have self rising) and toss in the butter. Now you need a pastry cutter or just fork with long tines , which is what I use.

Begin by simply cutting the butter into the flour.
Sit down and turn on the tv, this will take a few minutes (make sure your butter is cold).

When it looks like this and you can’t find any lumps of butter, you’re good to go :). Stick this bowl in the fridge for ten to fifteen minutes. If this is your first time making biscuits with this method, I recommend fifteen. The colder it is, the easier the next step is going to be.
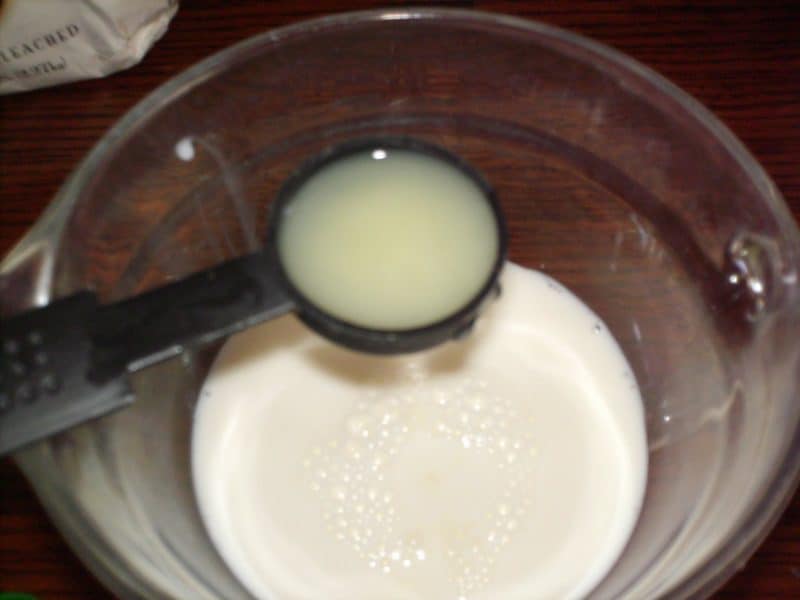
Add a tablespoon of lemon juice to your milk before you go get your bowl out of the fridge.
Stir it around and let it sit a minute or two.

Pour milk into flour mixture and stir until just moistened.
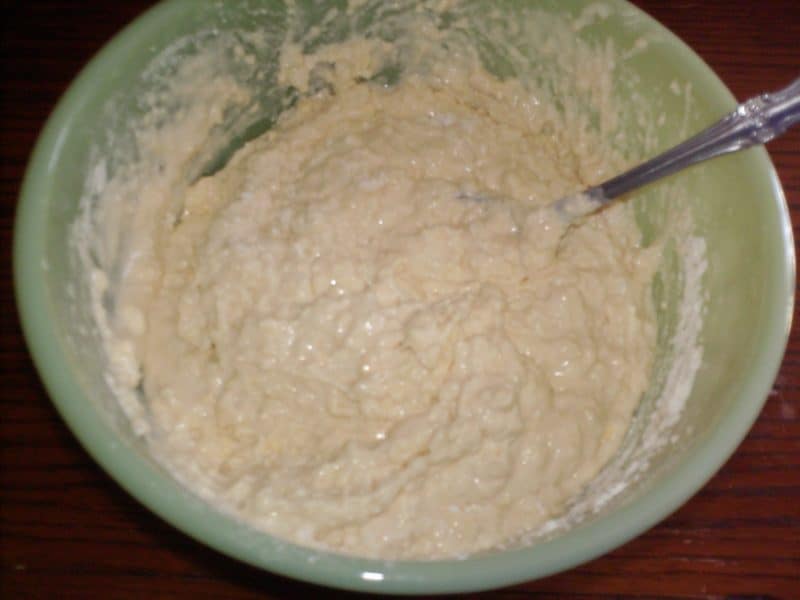 This is gonna be much looser than your typical biscuit dough, but it should look something like this.

Flour a surface.
I like to roll out waxed paper or do this on a large baking sheet so I don’t have such a hassle with the counter top.
Most folks just use the counter top though.
Be generous with the flour, you’re going to need it.
Preparing the Dough
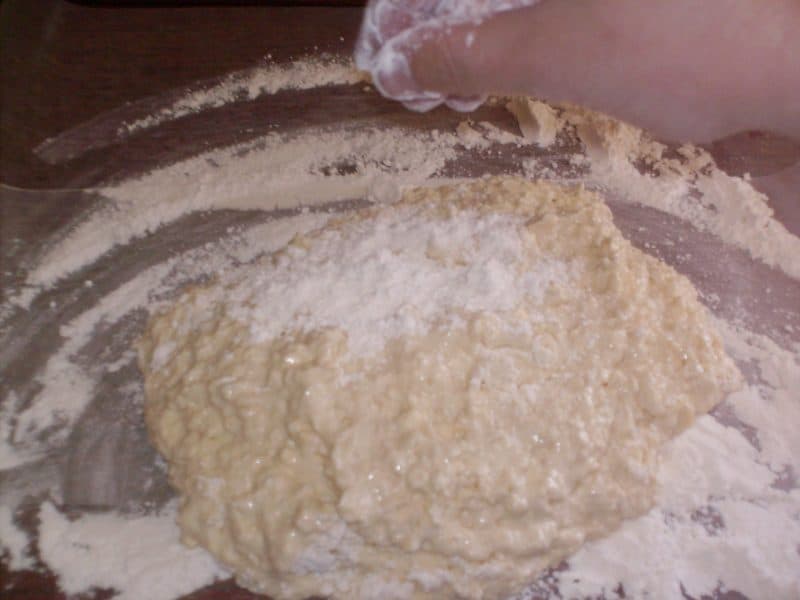
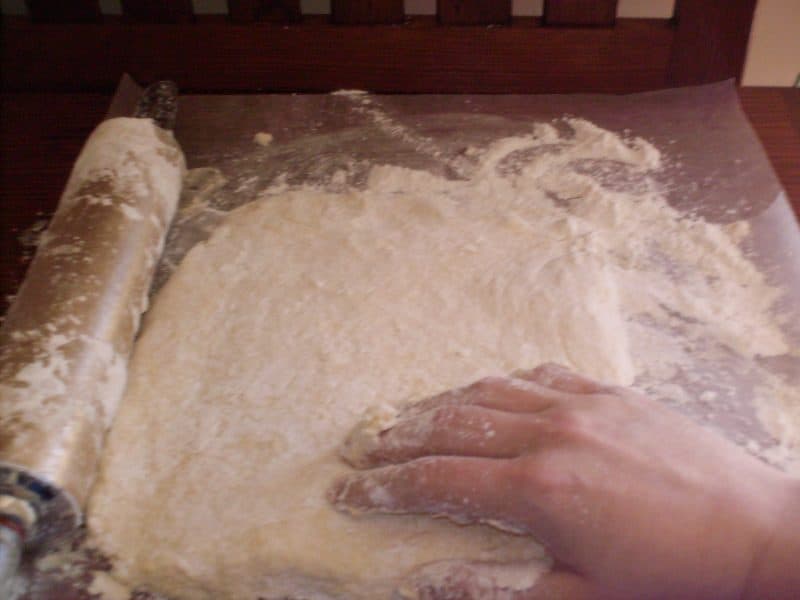
Dump out your dough onto the floured surface and sprinkle more flour on top of it.
Brush some flour on your hands and then wipe down your rolling pin really well. This is a family heirloom. My great grandmother bought it with green stamps for my mother when she was twelve. Once you have flour on your dough and on your hands, knead the dough with your hands two or three times. Don’t over knead your dough!
How do you knead your biscuit dough?
If you’ve never done this before. Just place your dough ball on a flat surface and then press down on it with the heel of your hand. Then fold it over into a bit of a ball again and repeat with the heel of your hand once more. You’ve just kneaded your dough twice. Stop there because we really don’t want to over knead and that is the most common mistake I’ve encountered in people’s biscuits turning out flat.
The second most common mistake I’ve encountered when biscuits turn out flat is someone who has accidentally followed the recipe for self rising flour biscuits using all purpose flour.
Roll it out until it is about 3/4 of an inch. Then lightly square it off with your hands. It should be about 9×5 inches at this point. You are going to have to stop after rolling it the first time and wipe down your rolling pin with flour again, as well as sprinkle some more on the dough to keep it from sticking.
Here is where these little suckers take on a bit of arrogance in my book. Normally, you would just roll it out and cut them, but in this recipe we want tender little pillowy biscuits, so we’re going to put a little more effort in them. Take one side of your dough and roll it over to the middle. Repeat with the next side until you have something like this.
The Buttermilk Biscuit Recipe Makes Dough That’s Wetter Than Other Biscuit Recipes
Now pat or roll that out with your hands back to the original 3/4 inch and gently shape it back into a rectangle.
Repeat this process of folding over and patting out two more times. Don’t be afraid to dust your surface and your dough with a little more flour if need be. Oh, and you didn’t really have to use the rolling pin, you could have just patted it out all along with your hands, but I wanted to show you my heirloom rolling pin!
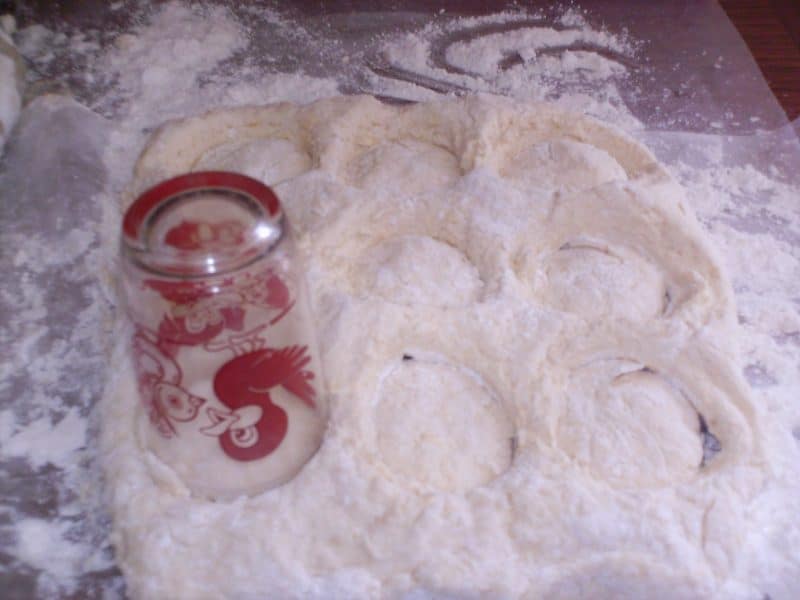
How To Cut The Biscuits:
Now we’re ready to cut our biscuits. Most folks would use a biscuit cutter for this, but diehard southerners know one of the best way to do it is to use a swanky swig! Tin can is also acceptable as is a drinking glass. I used a smaller mouthed swanky swig because I prefer a bit smaller biscuits. I have small people in my house. 🙂
What is a swanky swig?
Typically, it is a jelly jar which was decorated by the company to add charm and flair, thereby making it “swanky”.
Cut out your biscuits by pushing straight down with your glass, don’t twist it. I didn’t really waste all of this dough but I was trying to make it look a little more uniform for the picture. Normally, we cut them suckers one right on top of the other, then wad up the leftovers, pat it out, and cut again.
A lot of readers have said that they cut their biscuits with pizza cutters and just do a grid pattern. This ends up with square biscuits but no wasted dough! I do this every now and then myself.
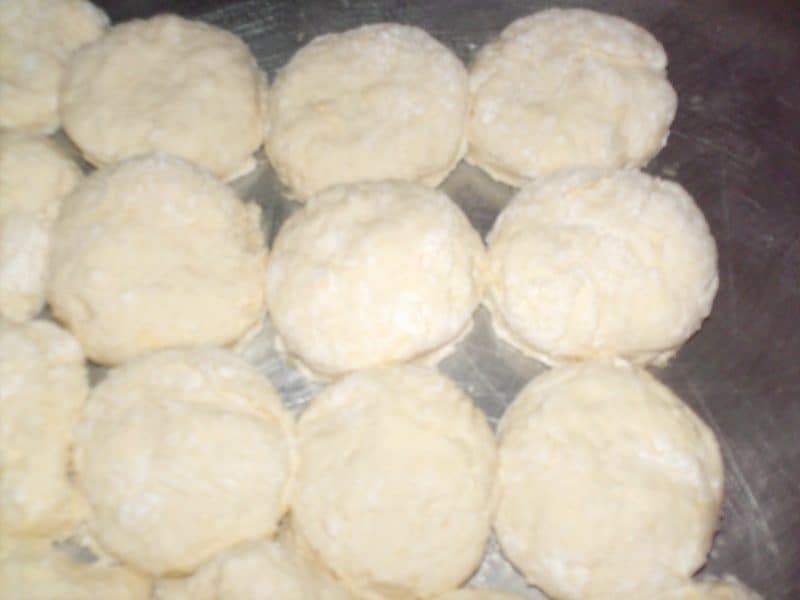
Place these on a well greased baking sheet and make sure the sides touch, This helps them rise evenly and higher.
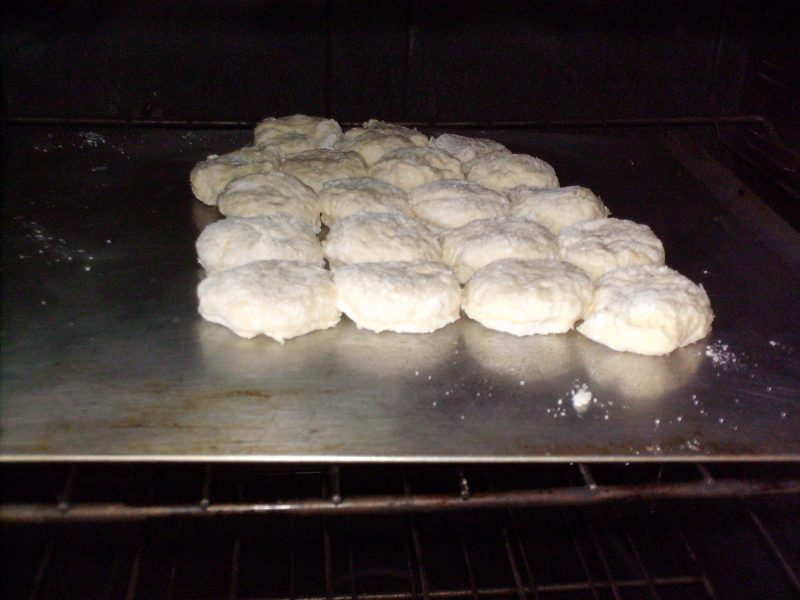
Bake at 450 for thirteen to fifteen minutes.
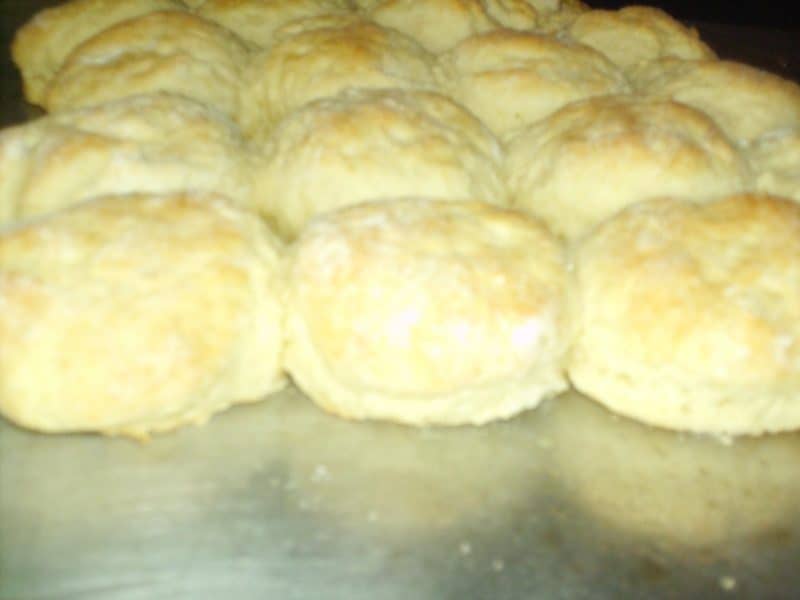
Until they look like this.
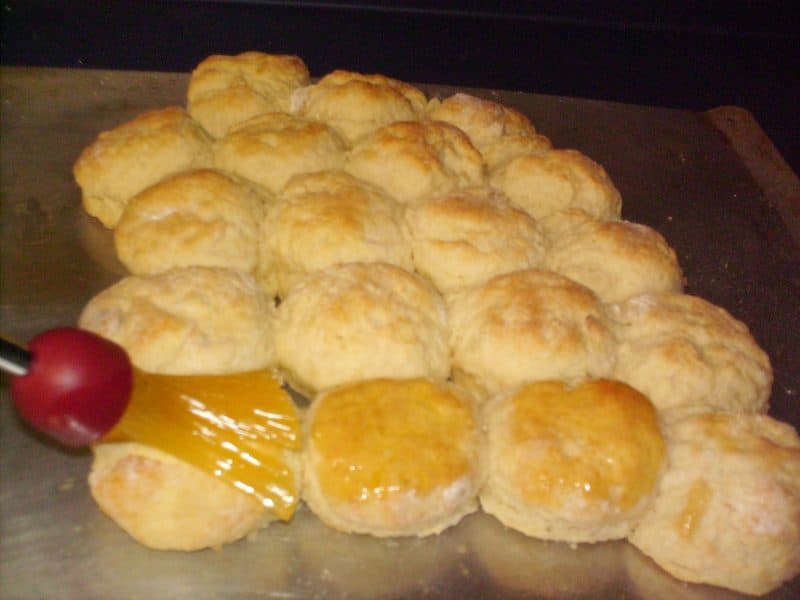
While still hot, brush with melted butter.
Alrighty then. Now you’re done!

Ingredients
- 1/2 cup cold butter or margarine
- 2 1/4 c self rising soft wheat flour *
- 1 1/4 c buttermilk or whole milk with a tablespoon of lemon juice added
- flour for dusting
- melted butter for brushing baked biscuits
Instructions
- Cut butter with a into 1/4-inch-thick slices.Put butter slices on top of flour in a large bowl. Cut butter into flour with a long tined fork until crumbly. Cover and chill 10 minutes. Add buttermilk, stirring just until dry ingredients are moistened.
- Turn dough out onto a lightly floured surface; knead 3 or 4 times, gradually adding additional flour as needed. With floured hands, press or pat dough into a 3/4-inch-thick rectangle (about 9 x 5 inches). Sprinkle top of dough with additional flour. Fold dough over into itself, like you are folding a piece of paper into a letter, in three sections. Repeat entire process 2 more times, beginning with pressing into a 3/4-inch-thick dough rectangle (about 9 x 5 inches).
- Press or pat dough to 1/2-inch thickness on a lightly floured surface; cut with a 2-inch round cutter, and place, side by side, on a parchment paper-lined or lightly greased cookie sheet. Try to make sure they touch because this will help them rise higher.
- Bake at 450° for 13 to 15 minutes or until lightly browned. Remove from oven; brush with 2 Tbsp. melted butter.
Nutrition
You may also like these biscuit recipes:
Southern Biscuits Recipe A Classic With Only 3 Ingredients
Featherlight Chocolate Biscuits
Garlic Cream Biscuits with Bacon Gravy
“Friends will come and go. But your Family will always be there. Make your family your best friends.” ~Submitted by Southern Plate Reader, Janice. To submit your quote, click here.


I tried this recipe and loved it. Im just wondering if these can be made ahead of time and frozen.
I have never tried it but I don’t see why not. Let me know if you try it and how they turn out.
I have never been able to make biscuits. I can bake everything else….
I tried this and am ashamed to admit I still cannot make biscuits.
I even added a little more buttermilk – the dough was still dry and crumbly.
I don’t know what I did wrong.
I’m a lil confused & need guidance please. Your recipes have the “top” step by step directions with pictures & then the “bottom” official recipe. They don’t always match. I’m not being ugly & am only trying to become a better cook & learn new recipes & I need clarification.
On the “top” recipe you say to press down on dough with the heel of your hand. Then fold it over into a bit of a ball again & repeat with the heel of your hand
once more. ‘You’ve just kneaded your dough twice. Stop there because we really don’t want to over knead.’
But on the “bottom” directions you say: ‘Fold dough over into itself, like you are folding a piece of paper into a letter, in three sections. Repeat entire process 2 more times.’
To me the top directions say to fold the dough over into itself a total of twice only..2 folds. But the bottom directions tell me to fold the dough twice like folding a pc of paper into a letter (which would be 2 folds. bringing the bottom part up to the middle & then the top part down to the middle) ‘then do that 2 more times’ ..which to me would be a total of 6 folds.
For someone who has never made biscuits, nor has any experience kneading (me) this is confusing. Please help..anyone. Thank you!
I came to the comments section to see if anyone had discussed which was better, butter or margarine. Then I came across the above post…..ugh.
She actually explains this very clearly in the step by step. If you keep reading after she says “stop there because we really don’t want to over knead” then you will see she explains how to roll it out until it is 3/4 of an inch thick, then fold it over on both sides and roll it out again. You do not knead your dough with the heel of your hand anymore than the initial 2 times. When she says “Repeat the entire process 2 more times” she is referring to to only the rolling it out and folding it over. It is a separate step entirely and is explained that way.
Also, I’m typically super non-confrontational but your post came off very rude in my opinion (this is directed towards the above post, written by Shelly). The recipes and instructions found here are EXCELLENT and I’ve never found them not to match up. However, even if they did, that would just be simply human error and well hey, if you don’t like it, don’t read it. Move on. Good luck becoming a better cook, maybe you will find a better attitude along the way!
Miss Emily, (and Christy if you too were offended) I sincerely apologize that you thought my post was rude. It most certainly was not written in a hateful, rude manner or attitude. I have never made biscuits or any type of “bread” before so the terms “knead” “fold” etc are like Chinese writing to me. I agree that Christy is A+++++ #1 on her directions. “I” am just having trouble understanding for the reason given… never having any experience. I will re-read Christy’s directions as well as yours…well the helpful parts anyway and hopefully can make sense of it for ME. I’ll take the high road so to speak and not lash out at you like you did me because this is not a ‘free for all’ website, it’s one to help others learn to cook new things. Just a lil reminder: You can’t see a person’s expression or hear their tone of voice over the internet. Ditto on the attitude 🙂
Finally! A biscuit recipe even I can make. As much as I love to cook, I’ve never been able to make biscuits. It took me twice to get this one right. First time I made the classic mistake because I had not labeled my flour and used all purpose. I also used the milk with lemon. Didn’t turn out well but I knew my mistakes. The second time, they were perfect. Thank you so much for this recipe. I will pass it to my children.
I am so glad you realized what happened and tried again Sandra!
I just tried these, had to improvise a little on flour but followed the proportions and techniques, oh my these are by far the best I’ve made, tender and light. In the past I’ve made every mistake mentioned and now I get it! Thank you!
I am so glad to hear that you liked them Jiminy!!!
Hi Christy,
I am trying this recipe right now but I made a terrible mistake. I tried to make my own self-rising flour because I didn’t have it, but instead of adding baking powder, I mistakenly added baking soda!!! Is there a way to salvage my dumb mistake? 🙁
I thank you in advance for whatever your reply will be.
I am old school and I’ve been cooking 30+ years and this is the best recipe for biscuits I’ve ever tried . I would like to thank whoever came up with it. They are so good.
I am so glad to you liked it Mary!!!