Simply Brilliant Canning Labels
I don’t get to brag on my readers enough but let me tell you, y’all are some brilliant people. You are also some of the absolute nicest folks I’ve ever had a chance to know and seeing you gathering around my virtual front porch here on Southern Plate has been one of the most fulfilling joys of my life (aside from my kiddies!). When I say I am grateful, I hope you know that if you are reading this, you are one of the things I am grateful for.
One of my brilliant readers sent me the neatest idea for canning labels and I just absolutely love them. They even gave me permission to share them with you so that you can love them, too! These are so much nicer than sticker labels and there is no residue to deal with. I just know you’ll think this idea is as neat as I do!
From Lee:
These canning jar “lid labels” are made from card stock and they are very simple. The best part is that they are not glued or stuck onto to the jars. If you want, they could even be re-used or laminated. With a little digging on the internet for clip art you can find something for just about anything you want to can.
I have attached my word files I used to print the labels, feel free to have them and share them at will. After you have edited the document, use one of your jar rings to make everything can bee seen in the ring opening. I then print them out on both sides of the card-stock. If you use both documents they will line up when you flip the card stock over. However, I do suggest a quick test print on plain paper to see if it is all set and looks good first.
After you have them printed, use the jar ring and a sharp pencil to trace the outside of the ring while trying to get as close to the “underside” of the curve as you can. The closer you can trace the ring, the easier it is to simply cut along the edges of the pencil line and have it fit inside the canning ring perfectly. If you wish to laminate the labels, print them out, trace the circles and then have your local office store laminate the whole sheet before cutting them out.
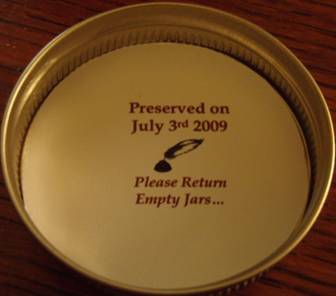
Here are the ones I made for my Strawberry-Rhubarb Jam that I am canning tomorrow.
As you see, there is plenty of room for what ever you wish to print inside the lid.
There should be more than enough room for a full ingredient list too!
To download these labels which can be easily personalized to suit your needs, please click the files below.
Download Labels front
Download Labels Back
Thank you so very much to Lee for sending this in to me! Here are the results!
I’ll never use stickers again!
Gratefully,
Christy 🙂
“Blessed are those who can laugh at themselves for they will never cease to be amused!”
Submitted by Southern Plate Reader, Diane in PA. To submit your quote, click here.


Hello there, just became aware of your blog through Google,
and found that it’s truly informative. I’m going to watch out for brussels.
I’ll appreciate if you continue this in future. A lot of people will be benefited from your writing.
Cheers!
I have a question on is there more the just the strawberry rhubarb design. I am not all that great with the computer sorry. I just see that there is only a pg 1
This is awsome! Thank you so very much for sharing
I love this idea, I hate trying to get the stickers off the side of the jars and I think that writing on the lid with a marker looks crummy. I will definatly use this idea, Thank you…. Sheila V. Monroe, Michigan
Great label idea! I can’t afford to have someone else do my laminating, so I keep a roll of clear contact paper in an empty wrapping paper tube and use it to laminate what I need to waterproof. It’s a cheap option for those on limited funds.
I tried this and would never go back to sticker labels! I love it! I have been able to personalize it and add my own decorative touch.
Thanks!
I have never heard or seen more brilliant ideas on one project than I’ve read here. Thank you for all for making my canning projects complete. I love the part about “return the empty jar…”